 Angular Rust
Angular Rust
Angular Rust is a high productivity, platform-agnostic frontend framework for the Rust language. It now supports desktop and web development. Angular Rust currently uses Clutter for desktop development and WebAssembly for web development. We are planning to add support for mobile development.
- Simple starting point to development.
- Utilize OpenGL >=1.4, OpenGL ES 1.1 and OpenGL ES 2.0.
- Transparently utilize Cairo and HTML5 Canvas.
- Have an advanced animation features.
- Responsive and mobile device compatible.
- Customize and extend friendly.
Get Started
Lets write simple program, old school call it Hello Angular Rust.
I am using Ubuntu for this tutorial. For Windows and MacOSX, the steps are not very different, but I will write the instructions a little later.
There are some requirements for installed packages.
$ sudo apt-get install libcogl-dev libclutter-1.0-dev libpango1.0-dev
you may also need to run
sudo apt-get updatebefore installing packages.
Just create new project. I prefer to create folder for my new project and then initialize project. So:
$ mkdir justapp
$ cd justapp
$ cargo init --bin
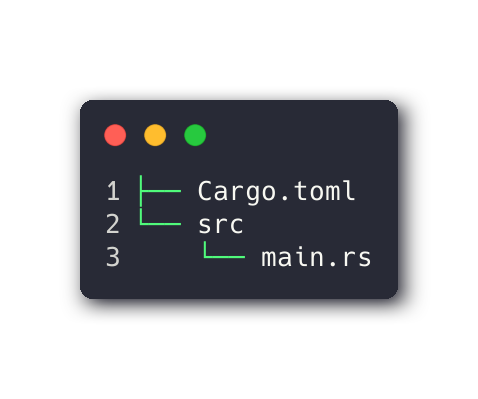
Cargo has created a folder structure as shown below:
Then add Angular Rust dependencies to your project. The UX Framework is the main starting point for getting started with developing Angular Rust applications.
It allows you to shorten the path for accessing Angular Rust components and allows you to maintain consistent internal Angular Rust dependencies.
Let's do it from the terminal using cargo-edit.
If you haven't installed
cargo-edit, justcargo install cargo-edit
$ cargo add ux-framework
Replace the code in the main.rs file
use ux::prelude::*;

#[derive(Default, Application)]
struct Application;

impl Application {
    fn new() -> Self {
        Default::default()
    }
}

fn main() {
    Application::run();
}
Let's run it from terminal:
$ cargo r
Oooh ... What's going on?
You just launched the application and it works, but nothing happens. Let's make it more visible to see our application.
press
Ctrl+Cin terminal to exit our application
Add this line closer to the beginning of our source. This will allow us to use the window in our application.
use ux::Window;
I am assuming that the window must belong to our application. So let's change the Application struct as shown below.
#[derive(Default, Application)]
struct Application {
    window: Window,
}
If we run it again, we will see the same picture as before - nothing is happening.
Let's configure our application window and show it. Change the new method of our application as shown bellows.
fn new() -> Self {
    let app: Self = Default::default();
    app.window
        .show()
        .set_window_size(512, 512)
        .set_resizable(true)
        .set_title("Sample window")
        .connect_destroy(move |_win| {
            Application::quit()
        });

    app.window.set_background_color(Some(color::TEAL_9));

    app
}
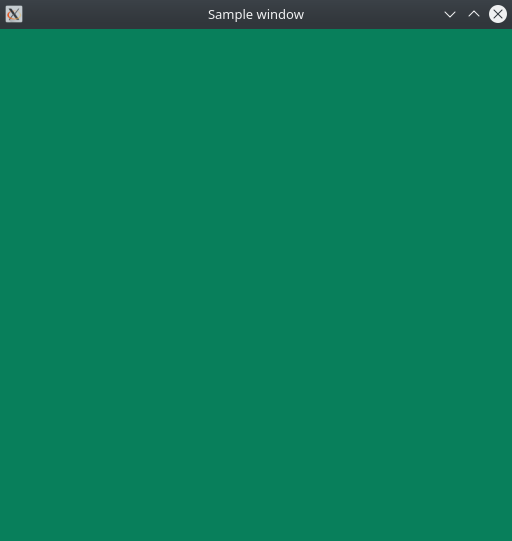
It's time to see our app.
$ cargo r
Let me explain what we have written in the new method of our application.
- We created the structure of our application as before, but saved it in a variable to access the application window.
let app: Self = Default::default();
- Below we have customized our window and shown it. We have set the initial window size and allowed the application window to be resized. Then we changed the title of our window.
app.window
    .show()
    .set_window_size(512, 512)
    .set_resizable(true)
    .set_title("Sample window")
- I would like the application to exit correctly when the window is closed. For this, we added a handler for the "window-destroy" event to properly exit our application.
...
    .connect_destroy(move |_win| {
        Application::quit()
    });
- We painted our window in TEAL color because -
Rake Likes This.
app.window.set_background_color(Some(color::TEAL_9));
- Finally, we return an instance of our application, by last line
app.
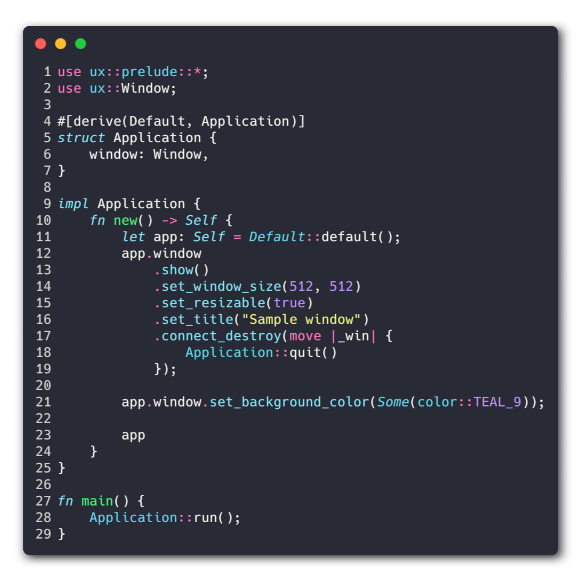
Final code
What's next
Tutorials will come here every day. The work is being actively carried out.
-
Read the documentation for
UX Frameworkof Angular Rust on docs.rs.The documentation is organized in a flat format. So the documentation for the entire framework is in one place. If you want to get information on specific properties in a more concentrated manner, then refer to the modules. I find this approach very convenient.
-
Join US on social media: reddit
Happy coding!